|
Inoled Products |
|
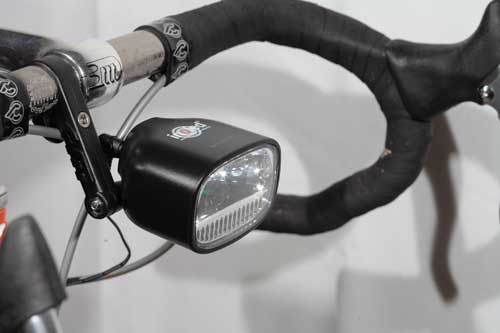
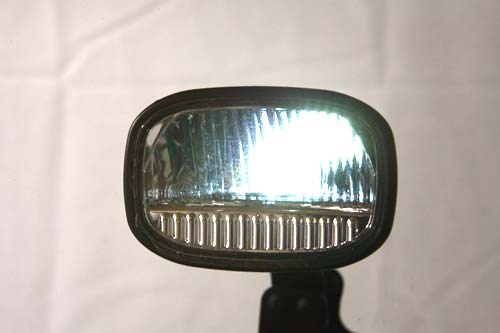
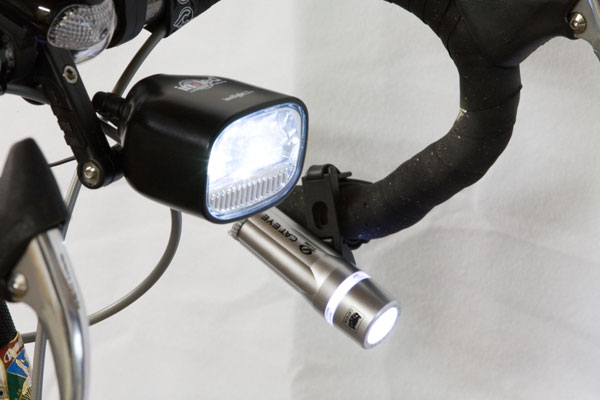
This page is rather out of date. Inoled is no longer in business. I have a few lights left in stock, at huge discounts. The Extreme is now $40. The Inopower battery pack is also now $40. The new Inolight Extreme has arrived! This is an impressively bright headlight. Basically, if you can't see the road well with this headlight, you need to be walking, with a cane. My headlight beams page now includes the Inolight Extreme. You can now easily compare its beam with others from Supernova, Schmidt, Busch & Müller and Spanninga. We have the Inopower battery packs. The Inoguards are back in stock as well. Also, the Extreme is now available in a silver finish for a just a few dollars over the price of the black version. The 10+ is not offered in a silver finish, only black. Inoled makes highly innovative headlights for bicycles. Some makers of LED headlights aim the LED straight ahead and use the reflector to focus the remaining light. Inoled aims the LED straight up towards the reflector, thereby having complete control over virtually all of the light coming from the LED. The result is a beam that is extremely bright since there is little wasted light off into the bushes and up into tree branches overhead. And, the beam of light is very well formed on the road. There is a sharp horizontal cutoff at the top of the beam, just like a high quality European automotive low beam. No light is focused into the eyes of oncoming drivers, so they will not be likely to turn their high beams on when coming your way. Of course there is still plenty of light (spill light) available for oncoming drivers to see you, just as there is when an automobile has the low beams only on. But the Inoled focused beam is the important part. It's brightest at the top of the beam, and then gets progressively dimmer towards the bottom of the beam. The top of the beam hits the road much further away from you than does the bottom of the beam, so the top of the beam needs to be brighter. The light reaches full brightness a bit under 5mph. The beam is quite wide and has no hot spots or dark spots, just a very even patch of light on the road ahead. For single track mountain biking, I recommend using the Inolights with the Inopower battery pack, since you'll often be riding at speeds below 5mph where a dynamo will not have sufficient output for the Inolight headlight. But with the Inopower battery pack the Extreme makes an excellent beam for riding singletrack at night. The Inofix bolt will enable convenient mounting of the Inolight directly to the handlebar stem. The Inolight would be aimed lower for riding singletrack than for riding on roads at higher speeds. The Inolights can be used with either a dynamo, such as the SON28 or SONdelux, or one of the other 6 volt dynamo hubs on the market such as Shimano and Sanyo, or it can be powered by the Inopower battery pack. When powered by the Inopower, you can use the headlight by itself. If however you power the Inolight with a dynamo hub, you must have a taillight attached and you must use the Inoguard circuit. Inoled Extreme Headlight
Inolight 10+: $ Recommended for most commuters and night riders who keep their speeds under 25 mph. If your riding is on steep hills, you may want a brighter light. See the Extreme 30, below. If you don't have fast descents and you're mostly just cruising along, save you money and get the Inolight 10+. Both the Inolight 10+ and the Inolight Extreme headlights can be powered by a variety of power sources. Inoled makes a 6 volt battery pack, the Inopower, $ 40.00 which uses NiMH rechargeable cells. Or if you prefer, you can power these headlights with any high quality 6 volt dynamo, such as the Busch & Müller Dymotec 6, Dymotec S6. Or a hub dynamo like the Schmidt SON 20 or SON 28 can be used. With hub dynamos a tailight and a special circuit must be used to prevent overheating of the Inolight. This is the Inoguard, which replaces the wire from the Inolight headlight to the taillight. $ 10.00 The Inoguard is not needed when two Inolights are wired in parallel to a dynohub. The Inolights can be used with or without a taillight if you are powering it with the Inopower battery pack. Inolight Extreme Headlight
Inolight Extreme: $ The Extreme is also available in silver.
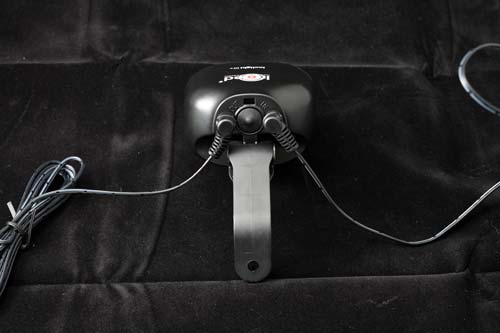
The plug on the right is the input. Attach that side to your power source. The plug on the left is used for the taillight, which is also powered by the same power source. The two plugs look identical, but are in fact different. The button in the center is the On/Off switch. The right hand, or "In" socket takes a plug with 5.5mm outside diameter (O.D.) and 2.1mm inside diameter (I.D.). The left "Out" socket takes a plug with a 5.5mm O.D. and a 2.5mm I.D. These can be purchased at electronic supply stores. We now have these available with wiring attached at a cost of $5.00. The headlight to hub wire measures 70cm. If that isn't long enough, you have two options. You can buy our replacement 6 foot wire for $5.00, or you can simply splice extra wire onto the bare end of the wire that's included with the Inolight. In winter, while riding with heavy gloves or mittens, the small switch might be awkward to press with the two plugs on each side while you're riding. If the Inolight were a halogen type, you'd want to be sure to always switch it off during the day lest you use up the bulb. But the LED in the Inolight will last almost forever, tens of thousands of hours in fact. So, given that having a light on during the day increases your visibility to others, and given that the drag from the light is incredibly low, it's almost silly to even have an on/off switch. If you're using the Inolight powered by a hub dynamo, why not leave the headlight turned on all the time? If you're using the Inopower battery pack or a sidewall dynamo which is a little noisy, you may want to turn off the Inolight during the day. But turn it on before putting on your heavy winter mittens. ;-) And the run times with battery power are long enough that while commuting in traffic, I'd still suggest leaving the light on for added safety. You'll still have plenty of battery power left for the ride home in the dark. I don't know the specification of the plugs, but I have found them at Radio Shack so they are readily available. And I stock replacements with wires attached. There are two different sizes. The outside dimension is the same for both, but the inside dimension is different, so be careful. The power plug, attached to the shorter of the two cables, has a smaller inside diameter, preventing it from being plugged into the taillight output on the rear of the Inolight. Don't use the longer taillight wire to connect the Inolight to your power source as the plug will have a loose fit in the socket and the light will be intermittent. When ordering an Inolight, be sure to tell us what power source you'll be using. If it's a Schmidt SON hub, we can provide the little spade connectors you'll need to attach the wires to the Schmidt's axle connectors. They sell for $ 0.24 each. And of course you'll need the Inoguard with any dynohub. The Inopower battery pack comes with the proper connector to the Inolight. If you power the Inolight with a sidewall dynamo attached to your rear wheel, you'll need to splice in more wire to lengthen the power wire. Let us know if you need more wire.
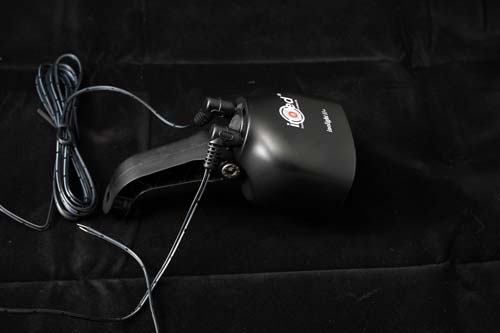
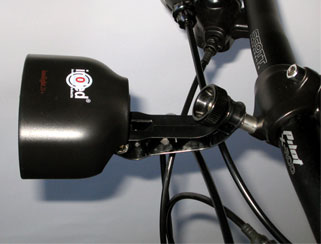
The Inolight is here shown attached to the fork crown mount. This mount is included with the headlight. The photo at the top of the page shows the Inolight mounted on the R&M handlebar mount. The R&M is not included with the headlight and can be purchased separately for $ if you prefer to mount the headlight directly to your handlebar. While other headlights are designed specifically for battery power or dynamo power, the Inolights can be powered by either type. And you don't use a specific type of Inolight for battery operation and another type for dynamo operation. No, the very same headlight can be powered by any of these power sources. So you can have one bike with a 26" front wheel using a Schmidt dynohub and another bike with 700c wheels for which you haven't built a front dynohub wheel. No problem. On the other bike, power the headlight with the Inopower battery pack. Just move the headlight from one bike to another, and change from one power source to another. Plug in the wire from the dynohub or the battery, connect your taillight and go. The headlight's internal electronics figures out what to do to make best use of the power available. When you're using these with dynamo power, the headlight reaches full brightness at just under 5 mph. The headlight comes with a wire with a plug on one end to plug into the Inolight and bare ends on the other end to attach to whatever power source you prefer. It also comes with a second wire for attaching the taillight. Both Inolights have a standlight. So when you stop riding with your dynamo hub or sidewall dynamo, the light will remain lit at a reduced brightness for several minutes. The standlight isn't bright enough for you to see the road. But it does help others to see that you're there. Riding without a taillight. The Inoled Extreme must be used with a wired taillight, IF you will be powering the Extreme with a dynamo hub. And in that case you must also use the Inoguard taillight wire. When using the Inolight with a battery, you may use a taillight if you wish, or not. It makes no difference. Inopower NiMH Battery Pack
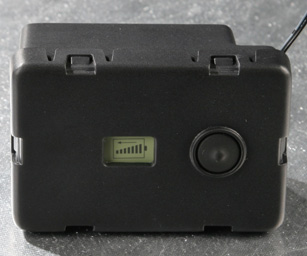
The Inopower rechargeable 6 volt / 3600 mHR battery pack and charger, $ 40.00 . Recharging time is one hour. The charger will not overcharge the battery. The gauge indicates the charge state of the battery. The battery pack can be attached to a belt, in a pocket or directly on the handlebar using the included cordura pouch. There's a clear window in the pouch so you can see the power level meter. Just as the headlights have smart electronics to allow you to use many different power sources, the Inopower battery pack has smart electronics to provide constant voltage and prevent overcharging. You'll always know the power level available. A cable is included to plug the Inopower into the Inolight. And of course a charger is included. The Inopower weighs 12 1/2 ounces or 356 grams. It measures 3.5" x 2.5" x 2". Run time when powering the Inolight 10+, over 7 hours. Run time when powering the Inolight Extreme, about 4 hours. When we first imported the Inolights, we understood that a variety of battery voltages were suitable. But now we have had some problems with people using battery packs other than the Inopower pack we sell. So I no longer suggest using the Inolights with any battery system other than the Inopower. And any Inolights sold after October 25, 2006 will not be warranteed for any damage resulting from use with any battery power source other than the Inopower. Lenkerhalter
The Lenkerhalter handlebar mount is made specifically for the Inolight headlights. It won't work with other dynamo powered headlights. The thumbscrew makes it easy to remove the light from he handlebar. $ 12.00
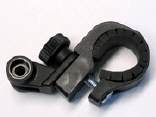
Inofix
The Inofix is a replacement bolt for most types of threadless stems that allows you to attach the Inolight to your stem. The Inofix is made in three sizes, 5mm, 6mm, and 7mm. We stock them all of course. The Inofix, $ 13.50 is not included with the headlight but may be purchased separately.
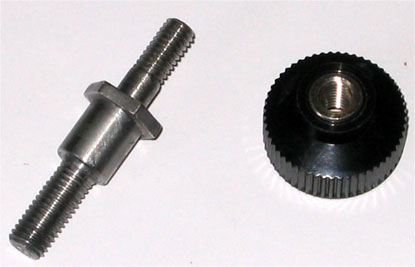
Here's a close-up view of the Inofix holding the fork mount (on the left) to a threadless stem.
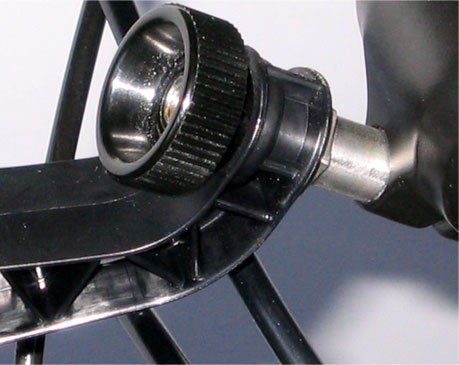
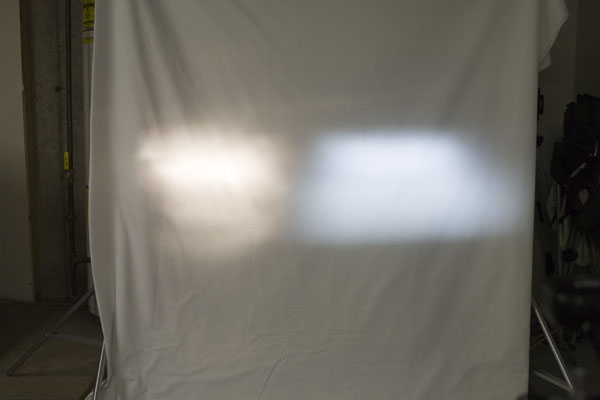
The Inofix consists of two parts, the center bolt on the left, and the gnurled nut on the right. First, tighten the bolt into the stem with a wrench. It replaces one of your existing stem bolts which you'll need a wrench to remove. Then put the fork mount onto the Inofix bolt and thread on the gnurled nut with your fingers. The center bolt needs to be tightened with a wrench, just like the other stem bolts. That's what keeps your handlebars from coming loose. But the gnurled nut only needs to be finger tight as it's only holding the Inolight on the bike. Make the gnurled nut too tight and you can damage the fork mount. That's why it's only tightened with your fingers. That way you can't make it too tight. Don't use a wrench on the gnurled nut! But when you put the center bolt into the stem, it has to be very tight, and you must use a wrench. Finger tight will result in you lying on the side of the road in a very unhappy state. Inoguard If you use any Inolight headlight powered by a hub dynohub, you need to also have the Inoguard circuit. The first version of the Inoguard replaced the wire connecting the hub dynamo to the headlight. As of Spring, 2008, the Inoguard is a bit different. It now replaces the wire from the Inolight headlight to the taillight. The Inoguard wire has a small circuit inline a few inches from the headlight. It prevents the high output of the hub dynamo causing the circuitry inside the Inolight to overheat. Inoguard circuit: $ 10.00 You don't need the Inoguard with sidewall dynamos, or the Inopower battery pack. What's the beam like? I've made a series of images comparing the Inolight 10+ and Inolight 20+ with several other headlights that I sell. All of the images were made using identical exposures, the same camera, same backdrop, same lighting, etc. I've also done some riding with the Inolight 20+, switching between it and several other headlights. When you look at these images, you might think that the lights aren't very bright. I've done that on purpose. By making the images dark, it helps you to see the different brightness of the beams at different points in the focused beam. For example, the Schmidt E6 beam is basically square when projected on a horizontal surface. If I just used a straight exposure, you would see an even patch of light. You wouldn't see that the beam is brighter at the top than it is anywhere else. So by darkening the entire beam, you can see how each beam varies in brightness.
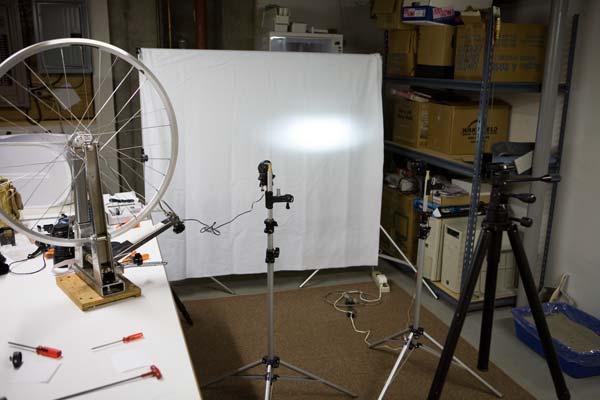
Here's my test setup. This is my little photo studio in our basement where I shoot the various products we sell. On the left is a wheel with SON hub in a truing stand. Here it's wired to a DLumotec Topal on the left side light stand. On the right light stand I've mounted a prototype Inolight 20+ which is powered by a transformer feeding it 6 volts. The production headlight has a taller beam. See below. Behind that and to the right is my camera's tripod. And for this shot I'm hand-holding the camera. Bottom right is the cat litter box. Every photo studio should have at least one. I spin the wheel with my left hand and shoot the image using a cable release to the camera with my right hand. The Inolight's beam is the same regardless of how it's powered.
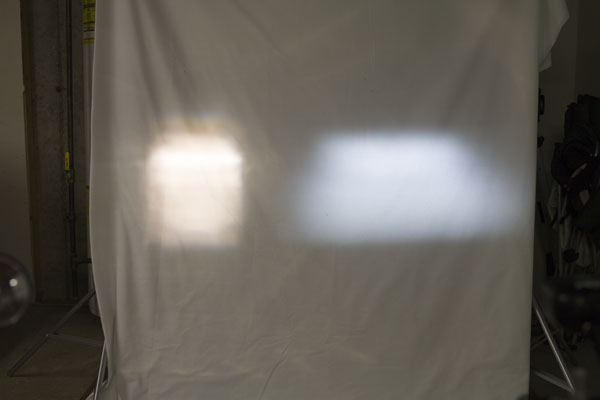
On the left you can see the beam from the Schmidt E6 headlight projected onto my photo backdrop. On the right, the beam from the Inolight 10+. The E6 is being powered by a Schmidt SON hub spun by hand on a truing stand. Very high tech! ;-) The Inolight is powered by the Inopower battery pack. Of course these lights aren't intended for lighting up a hanging photo studio backdrop, but are instead intended for lighting up a road surface. You can see that in the E6 beam on the left, the very top of the beam is quite a bit brighter than the rest, and brighter than any part of the Inolight 10+ beam. So the E6 can light up the road further away from you than the Inolight 10+ can. In other words, you can aim the very top of the E6 beam further down the road and still have a brightly lit road surface. That will help if you're riding fast. So for fast cyclists, the E6 will still be preferred. However, for the slower cyclist, the Inolight projects a much wider beam, enabling you to see a much wider section of the road ahead of you. Some of our customers complain that the E6 isn't as wide as they would like. The bright part of the Inolight beam is almost 50% wider than the E6, and the total width of the beam is almost twice that of the E6. This makes the Inolight an ideal headlight for commuting. Notice that except for the very top of the E6 beam, the rest of the E6 beam is not as bright as the Inolight 10+ beam. Overall, when riding, the effect of the Inolight 10+ is similar to the E6, except for you being able to see further with the E6. And with the wider beam, you have a better sense of seeing the entire road ahead, rather than a narrow path through the road. This is true on roads that are otherwise unlit. In urban areas with street lights, it's of course very different. And keep in mind while looking at all of these images that the shape of the beam when the light is pointed at the road ahead of you is very different than it is here. Here you see the Inolight beam as a wide horizontal shape, very short top to bottom. But when it's projected on the road, the beam is many times longer than it is wide. In fact the beam is just plain HUGE on the road! The E6 beam here looks like a square, but on the road it's a very tall rectangle, as seen by the rider. If you could look straight down at it from the sky, it would appear as a big trapezoid. Projected on the road, the Inoled beam is very much like the beam from the Schmidt E6 headlight, only much wider. The top of the beam is not as bright as the top of the E6 beam. So for high speeds you won't be able to see the road as well at a distance. But at normal riding speeds it lights up a wider path down the road, giving you a better sense of your surroundings. My sense when comparing the two headlights (Inolight 20+ and E6) on the road was that the two together would make the penultimate bicycle headlight. The E6 is extraordinary in its ability to light up the road at a great distance. The price for this is that the beam is narrow close to the bike, and you might feel like you want to see more of what's happening on each side of the beam. The Inolight doesn't have the long reach of the E6, but gives you a wonderfully wide view of the road both close to you and at a reasonable distance. In short they're both terrific lights, but one is perhaps better for riding at speed and the other is perhaps better for the rest of us.
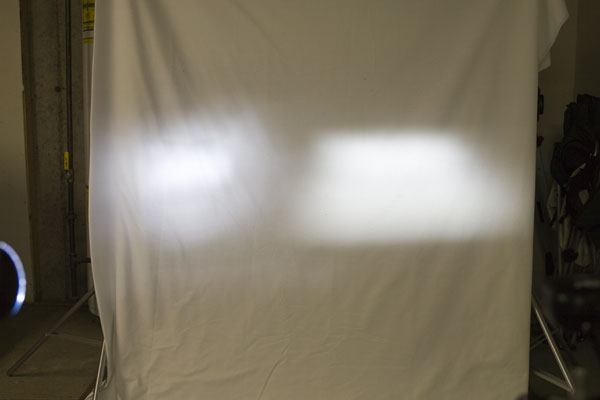
Here we see the Busch & Müller DLumotec beam on the left, and the Inolight 10+ beam on the right. The top of the Inolight 10+ beam is as bright as the brightest section of the B&M light. The difference that you see here is due to the way that the light is focused. The light from the Inolight's LED is almost completely focused into the patch of light you see projected here. With the Busch & Müller light, much more light is allowed to spill outside the focused patch. That's both good and bad. For others to see you, the B&M is a bit better, since there's more light off to the side. For you to see the road ahead, the Inolight is better, since its focused patch is brighter. But outside of its focused patch, the Inoled gives very little light for you to see the road with. People frequently call me up and ask, "Peter, which is better, the Inolight or the Busch & Müller?" I really don't know. Both lights are very good at helping you see where you're going and for helping others to see you. Remember that the beam isn't the only difference between the Inolights and other headlights. The Inolight can be powered by many different sources, DC, AC, 6 volt, 12 volt, whatever. So it's not quite an apples to apples comparison. The Busch & Müller LED headlights also come to full brightness at very low speeds, about 1.5mph, which is an advantage in intersections. In my own road testing, comparing the Inolight 20+ with the Busch & Müller DLumotec, I was able to ride comfortably at a little higher speed with the Inolight 20+. But the 20+ is a 2 watt LED, unlike the 1 watt LED in the B&M. And the B&M lights are made in a wide variety of configurations, many of which are less expensive than the Inolights.
Here we see the Busch & Müller Lumotec headlight with a 3 watt bulb on the left and the Inolight 10+ on the right. Just as with the Schmidt E6 headlight, the top of the Lumotec beam overloads my digital camera at this exposure. So with the Lumotec you'll be able to see further down the road than with the Inolight 10+. But at lower speeds for commuting the Inolight 10+ gives a much wider beam particularly at the lower section and does a little better job of lighting up the roadway ahead of you. Since the brightest part of the Lumotec's beam is not right at the top of the beam, as it is in the E6, the lower edge of the Lumotec's beam will be a bit further down the road than it would be with the Inolight, assuming you aim the Lumotec so that it's brightest part is just below the horizon. Here's the Inolight 10+ in my driveway.
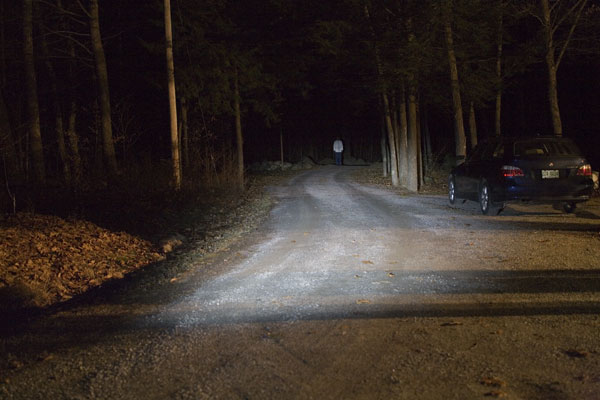
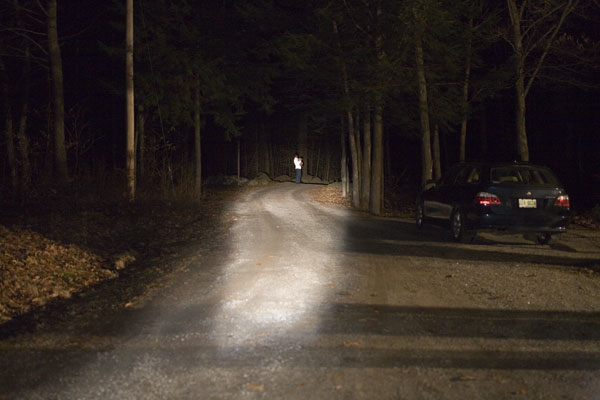
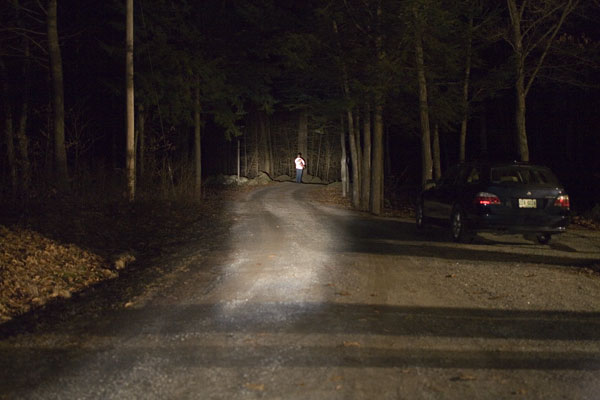
I've aimed the top of the beam at Linda's feet. She's standing 142 feet away, and wearing her Illuminite jacket. As you can see, the beam is wider than the driveway, in other words, it's wider than a car lane on a road. Normally, I wouldn't aim the Inolight quite this high. Placing the top of the beam at the horizon gives you less light where you need it for normal riding speeds, under 25mph. So in use, you'd actually have a slightly brighter light than this. I'm aiming the light this high to compare it with the E6 halogen headlight. Everyone will aim the light in the way that's best for himself. I'd put the top of the light no more than 100 feet away. Next is an image with the Schmidt E6 for comparison. Linda is holding Hobbes, the Attack Cat.
Notice that here I've also aimed the top edge of the beam, the brightest part, right at Linda's feet, the horizon. But because the E6 has more "spill" light, Linda is more brightly lit. But also notice that the beam close to the bicycle is not even close to being wide enough to cover a full traffic lane. The light is brighter than the Inolight, but for riding at moderate speeds, which beam is more useful? To give you a feel for just how bright the top of the E6 beam is, I've included another image below. In this shot, I've aimed the E6 higher than it ought to be aimed. I've placed the top of the bright E6 beam at Linda's head.
The trees behind Linda are 180 feet away from the headlight. There's no need to aim the E6 this high, (it's best when the top of the beam is aimed at the horizon, as in the image above) but this gives you an idea why I recommend the E6 for 40mph descents, and not the Inolight. But if you go back up to the Inolight image, and think about riding along at 20mph, on a road with lots of auto traffic coming in both directions, which light would you rather have? ;-) Some people will say, "Both!" And for them, there's an easy solution. Power the Inolight with the Inopower battery pack, and the Schmidt E6 with a dynohub. But I think most people will say that for riding at normal cycling speeds, the Inolight is ideal, all by itself, with no need for a Secondary headlight. And then you can power it with either the dynamo of your choosing, or the Inopower. The position of the LED in the Inolight housing prevents any light from "spilling" below the focused beam. That results in a dark area below the beam which gets no light at all from the Inolight, except for a small patch a few feet in front of your tire. So as you're riding, you'll see something on the road ahead, but if the road is completely dark, you won't see it very well when you ride up closer to it. Some people are OK with this but others may not like it. So if you want more illumination of the road close to the bike, I recommend using a tiny handlebar mounted light like the BRT spot from Planet Bike, $ 11.75 . That will fill in the dark area between the Inolight beam and the bike. Just aim it down pointing to a spot about 6 feet in front of the bike.
Here a Cateye EL400 is aimed into the dark area between the Inolight beam and the front wheel. The EL400 is inexpensive and is powered by 3 AAA batteries, preferably rechargeables since they don't fill up the landfill so fast. The EL400 has a wonderful rotating mount that makes it easy to position almost anywhere on the bike. $ Depending on your vision you may or may not need it. Some do, I don't. How about a taillight? The Inolight headlights can be used with all of the Busch & Müller taillights that we sell for dynamo power, whether you are powering the Inolight with a dynamo or Inopower battery pack. We sell both battery power taillights and taillights that are powered by dynamos. The dynamo powered taillights always are wired to the headlight if you use a hub dynamo so that the switch on the headlight can turn the taillight on and off along with the headlight. So if you are buying an Inolight 10+ or Inolight Extreme to use with battery power and want a taillight to work along with it, you can use one battery to power both headlight and taillight and have one switch to turn both on and off. Just buy a dynamo powered taillight from us and everything will work together perfectly. The Dreaded FAQ Q: Didn't you used to say the Inolights could be used without a taillight? A: Yes, I did. And that wasn t entirely correct. It's fine if you keep your speed under 25mph, or if you don't use a hub dynamo but instead use a 6 volt sidewall dynamo or a battery. But with a hub dynamo, you need to keep your speed under 25mph without a taillight, or add a second Inolight. See this page for all the details. Q: Can two Inolights be used simultaneously powered by a SON hub. Q: Can an Inolight be used with a halogen Secondary. Q: Is the LED replaceable? Q: What type of plug is used for the wiring? Q: Is wiring included with the Inolights? Q: Is wiring included with the Inopower battery pack? Q: Do you have connectors for the Schmidt and Shimano dynohubs? Q: Do I have to use the Inopower (Inoled's battery pack) if I want battery power? Q: What dynamos can I use? Q: If I make my own dynamo, does it need to be exactly 6 volts? Q: If I go too fast will a dynamo burn out my LED? Q: How big is the Inolight? Q: What type of on/off switch does it have? Q: Do I need a switch? Q: Is the Inolight waterproof? Q: How does the switch work? Q: Is the Inolight all the light I'll need? Q: I heard about an Inolight fork crown mount breaking. Is this a known issue? Where to purchase? You can purchase all of these Inoled products directly from us, and in time we hope you'll be able to find them at every bike shop in the US and Canada. If you own a bicycle shop in the United States or Canada and would like to sell Inoled products, just read this page and give us a call. We are the US and Canadian importer for Inoled. If you are a bicycle manufacturer and wish to include the Inolight as part of a lighting system on your bicycles, we can provide the Inolights in the quantities you require. Just give us a call. |
Go to: Busch & Muller sidewall dynamos
Back to Lighting Systems page Back to: Peter White Cycles LLC home page Penny is the Lord High Executioner of Email. So please send your email to Penny. Mail to: The email link above uses some fancy javascript voodoo to hide the actual address from spambots. Your browser needs to be set to run javascript in order for you to use any of the email links on my website. If you can't see the links, you can call us or send a fax. You can also type the address into your email software. First, type the alias, "penny". Then type the "@" sign. It's above the number 2 on your keyboard. Then type the domain, "peterwhitecycles.com". Don't put in the quotes! That should do it. You can also call us at 603 478 0900 It's best to call before 4PM Eastern time since after that we're either running around like headless chickens or at home ready to jump into the pot. Please don't place an order without first reading this. This page updated: Saturday, September 22, 2018 Peter White Cycles LLC |