Dynamo Light Wiring Instructions
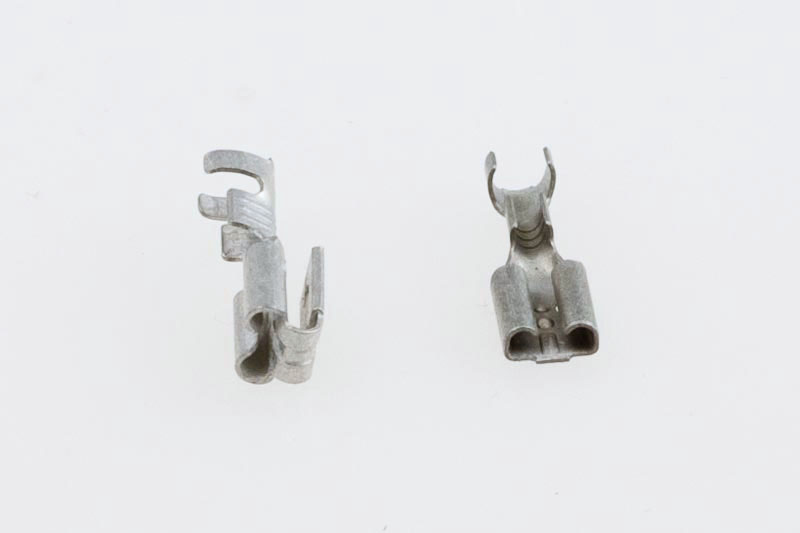
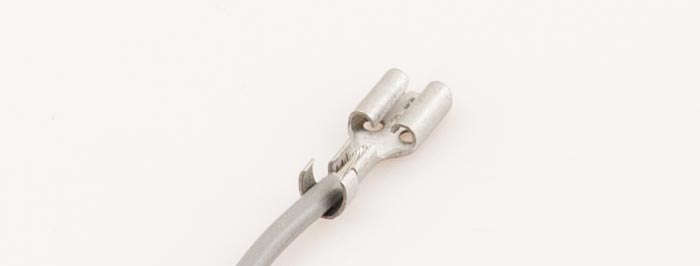
The SON (Schmidt's Original Nabendynamo) axle has two male spade connectors. In the photo below you can see one female wire connector attached to a male axle connector, and the other connector pair unattached.
The SON SL hubs are different. Please see this page for details.

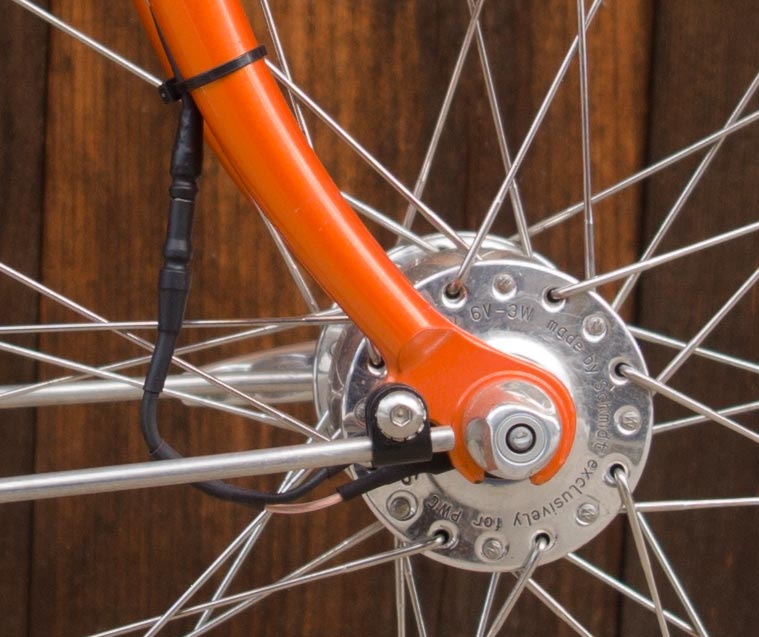
Most versions of the SON28 and SON20 hub made between 2001 and 2011 must be aligned in the fork so that those connectors are on the right (chain) side of the bike. If you have an older SON28 hub with a black painted center section, SONXS, SONXS100, SON20R or SONdelux it makes no difference which way you align the hub in the fork. And with the new SON hubs from 2012, you again have the freedom to place the hub in either orientation, unless it's a disc hub. On bikes without disc brakes, the connectors can be on either side of the bike.
The Schmidt Edelux II is available with a variety of wire lengths, connectors, and the aluminum housing can be had in a wide variety of colors.Please see this page for details.
If you wish, we can cut any long wire version to the length you need and attach the connectors with our special crimping tool, which does a far better job than can be done with pliers. Let us know when you purchase your light. We also sell proper crimping tools.
Busch & Müller headlights come to us with input wires with bare ends, which are compatible with most brands of dynamo hubs without any modification. Details on Busch & Müller headlights can be found here. Please see this page for details.
All Busch & Müller headlights can have connectors for SON hubs added here before we ship to you, or you could add them yourself if you have the right tools.
Supernova headlights come to us with input wires with bare ends, which are compatible with most brands of dynamo hubs without any modification. Details on Supernova headlights can be found here. Please see this page for details.
All Supernova headlights can have connectors for SON hubs added here before we ship to you, or you could add them yourself if you have the right tools.
Want to charge your cell phone?
Here is how a charger for a mobile phone or GPS can be incorporated into your SON hub dynamo and lighting system. Please see this page for details.
PiggyBack Connectors
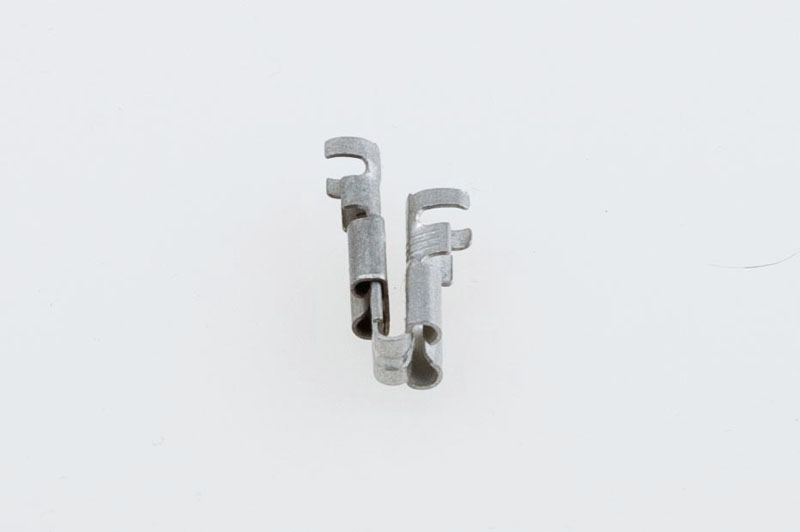
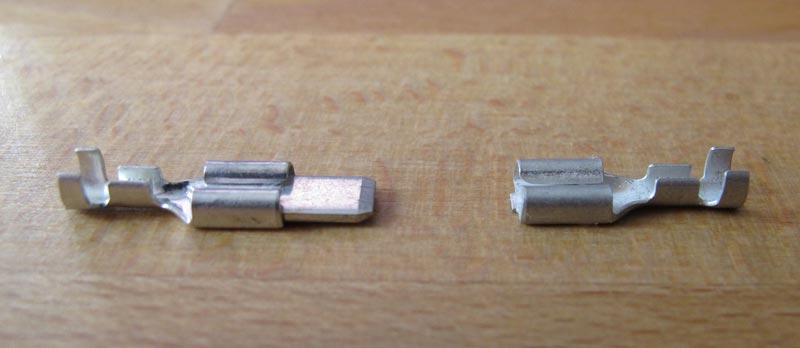
The piggyback connector is on the left and a standard 4.8mm connector on the right. The wire would be crimped to the top, just like a regular connector. And the piggyback connector attaches to the SON hub the same way. But it also has an additional male tab.
By the way; we sometimes get lazy and call the 4.8mm connector a 5mm connector. Don't be as confused as we are. They're the same thing.
Schmidt standard 4.8mm connector, Our part # SCHCON48: $ 0.24
Schmidt PiggyBack connector, Our part # SCHPGBK48: $ 1.00
Here, the regular connector (on the left) is partially connected to the piggyback connector on the right. So, with two piggyback connectors on the wires from one CYO headlight, and regular connectors on the other, you can have two lights wired in parallel.
To do this when using a Shimano or Sanyo dynamo hub, you feed one lead from each headlight into one side of the plastic connector, and the remaining two leads into the other side. You can't do this with a voltage limited hub. But, since I don't sell any voltage limited hubs, there aren't likely to be too many of those on this side of the big pond.
These piggyback connectors can also be used to integrate a Busch & Müller E-WERK into your system. One set of leads goes to the headlight, and the other to the E-WERK.
Tools
We now sell two tools for crimping connectors onto wiring.
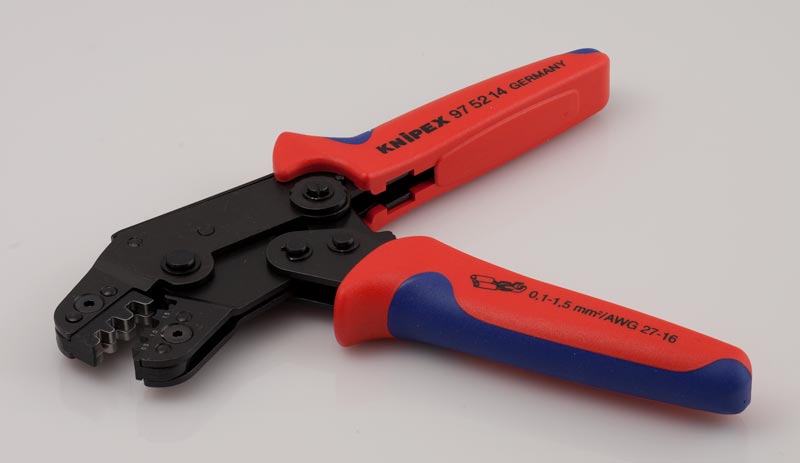
This is the very best tool for crimping the wire connectors for both Schmidt hub terminals as well as the terminals on dynamo lights from Schmidt, Busch & Müller and Spanninga. Place the connector in the tool, insert the wire into the connector, and squeeze once to make a perfect crimp onto both the insulator and the conductor. Made in Germany.
As with most of our lighting products, we offer this to bike shops at wholesale pricing.
Knipex 97 52 14, Our part # SCH72904, Retail price: $ 365.00
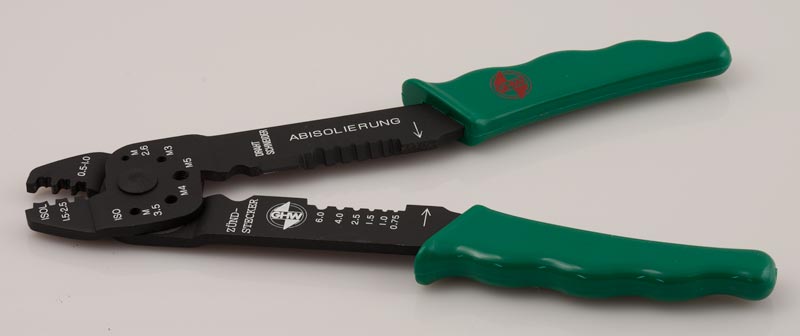
This multi purpose tool crimps the connectors. Not as sophisticated as the Knipex tool, as you must crimp the insulator and the conductor separately. But for the shop installing the occasional dynamo light system, it's ideal. It's also ideal for the home mechanic. Made in Germany.
The tool also purports to be a wire stripper. However, it does a horrible job of stripping wire. So just use it for crimping the connectors.
As with most of our lighting products, we offer this to bike shops at wholesale pricing.
Schmidt Basic Crimper, Our part # SCH72900, Retail price: $ 92.00
Wire too short?
So, you bought a Schmidt Edelux headlight to mount at the fork crown, and the wire is 60cm long. But now, you want to mount the headlight on the handlebar, or perhaps on the front of a rack, and the 60cm wire is too short. Here's the solution.
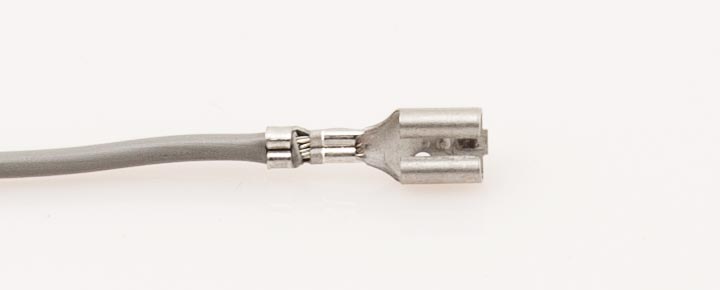
On the right is a female 4.8mm spade connector used to connect to the male connectors on the Schmidt SON hub axle. On the left is the same connector, but with a male stub that the nice folks at Schmidt soldered in place. For some reason, loose male connectors aren't available, so they made them for me. If you want your cable longer, let us know how much longer and we'll make you up an extension using the same high quality coaxial cable Schmidt uses for their headlights.
As with most of our lighting products, we offer this to bike shops at wholesale pricing.
Schmidt Male Soldered connector, Our part # SCH72144, Retail price: $ 2.00
Our Connectors
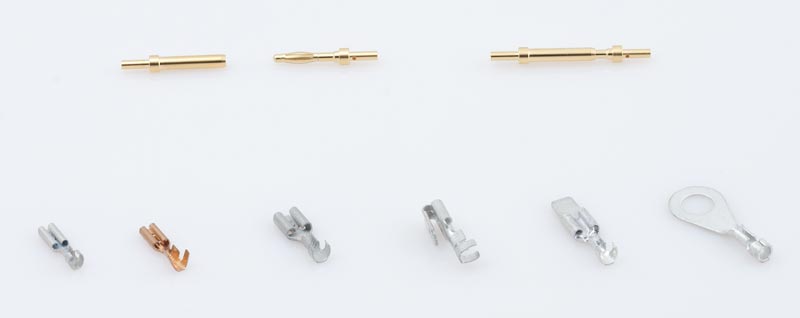
Here's our assortment of connectors.
Top left, the Supernova Gold Plated connectors. Here they are separated.
Top right, the Supernova connectors are shown connected.
Supernova Gold Plated Connectors, Part # SUPH161GC, Price: $ 16.00
Bottom left to right: Schmidt 2.8mm zinc plated connector for taillight connections. Next, the same style connector in copper as we get it from Busch & Müller. Next, the standard Schmidt 4.8mm hub connector. Next, the Schmidt Piggyback connector. Next (second from right) is the standard connector with male soldered plug, used for extending the wire from Schmidt SON hub dynamo to your headlight. And last, on the right is the Schmidt Ground connector, also known as a ring terminal. The most commonly used ring terminal has a 6mm diameter hole so it fits between a headlight mount and the Schmidt Edelux headlight. But we also now have these with 5mm and 3mm holes for other applications.
If you have a custom frame with an SL type fork, you can use the 5mm ring terminals to carry ground from the fork to a headlight, using a 5mm eyelet brazed to the fork. The 3mm ring terminal is used with certain upside-down mounted Edelux II headlights to carry the power side of the taillight connection.
The Supernova Gold Plated connectors are very useful. You can use them within the taillight wire if you have a bike with S&S couplers. Or if you find that you're frequently removing your front wheel, and are tired of unplugging the connectors before removing the wheel, and plugging them back on when you install the wheel, you can install the Supernova connectors down near the fork dropout along the hub to headlight wiring. They're easier to manipulate with cold fingers.
As of February, 2013, we also have 2.8mm male connectors. These are much less expensive than the male 4.8mm connectors shown above since they are stamped out in the bazillions by little green-eyed elves, deep in the Black Forest of Germany.
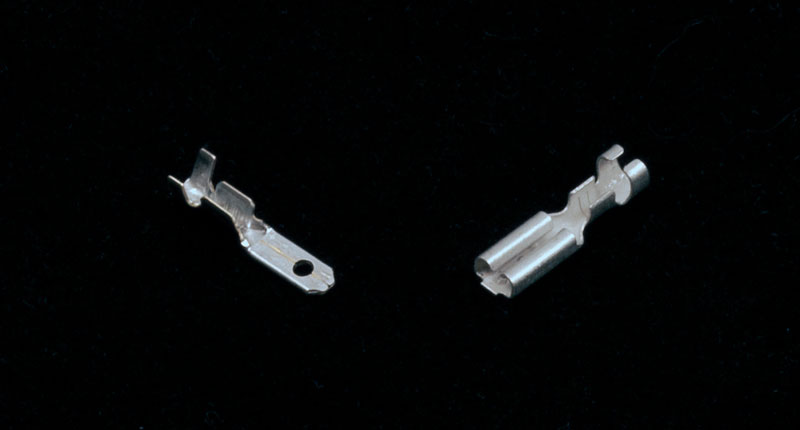
The male connector is on the left, the female connector is on the right. We've had the female connectors for many years. But now, if all you want to do is lengthen an existing wire, you can do it. It's also a very inexpensive way to make a break in a taillight wire. This is handy if you frequently remove a rear rack for shipping a bike, or have a frame with S&S couplers. These male connectors have the same tab that Busch & Müller and Schmidt headlights have for the taillight connections. And, of course, if you would like to have us make up a wire with these connectors installed, just ask.
2.8mm male connector, part # B&M470ST: $
0.32
2.8mm female connector, part # B&M470KS: $
0.44
Crimping Connector to Wire
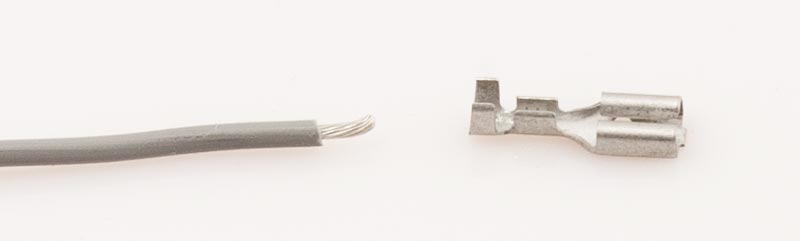
Here, the wire is stripped, and ready for crimping. You can see the two sets of tabs on the connector. The left pair is to crimp the insulator. The right pair crimps the conductor.
Here, the wire is laid into the connector.
And here the connector has been crimped onto the wire. By having a separate crimp on the insulator, you take a great deal of stress off of the conductor, so the connector can be disconnected and reconnected to and from the hub axle many times without damage.
When using the "Schmidt Basic Crimper" tool, first use the 0.5 - 1.0 position on the tool for crimping the conductor. Then use the 1.5 - 2.5 position for crimping the insulator.
The more expensive Knipex tool makes both crimps simultaneously, and you use the middle position on the tool.
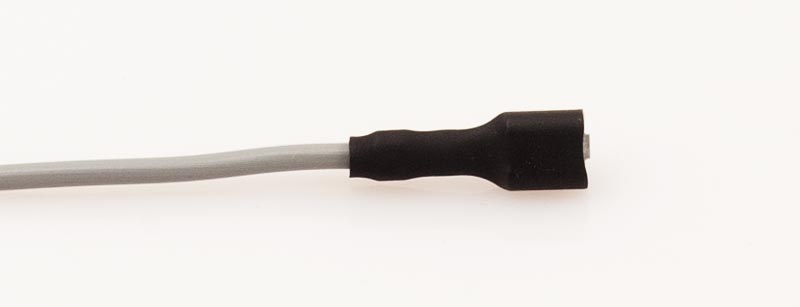
After crimping the connector, you can and should then apply heat shrink tubing.
Heat Shrink Tubing
Our heat shrink tubing comes in 1 foot lengths. The stated size is the size before it's shrunk. It can shink up to 1/3 it's original diameter. So it's referred to as 3:1 tubing. All of our shrink tubing is black.
1/8" is used for the 2.8mm spade connectors commonly used for taillight connections.
Shrink Tubing, 1/8" diameter, 3:1 - 1 foot long, Part # PWCST1/8BK, Price: $ 0.90
3/16" is used for the 4.8mm spade connectors on most Schmidt SON hubs.
Shrink Tubing, 3/16" diameter, 3:1 - 1 foot long, Part # PWCST3/16BK, Price: $ 1.20
1/4" is used for the Schmidt Co-Axial Connectors.
Shrink Tubing, 1/4" diameter, 3:1 - 1 foot long, Part # PWCST1/4BK, Price: $ 1.50
Schmidt Co-Axial Connectors
As of 2017, we have a more convenient method of connecting your headlight wire to the hub. The Co-Axial Connector.
The Schmidt headlight page shows the many options for wiring to a SON hub, and ways to include a mobile phone or GPS charger to the wiring. Please see this page for details.
Connecting a rear light.
The taillight should always be wired to the headlight, not to the dynamo hub. Only the headlight is wired to the hub. Busch & Müller, and Schmidt headlights have connectors which are used to connect to a taillight. Different manufacturers use different types of connectors. But the wiring scheme is always the same; hub to headlight, and then headlight to taillight. Never wire a taillight directly to a dynamo hub.
One Wire or Two?
I strongly recommend two. Here's why.
As I write this in 2021, it is still possible to buy headlights, taillights and hub dynamos that make a "ground" connection via the bicycle's frame, so you would only need to run a single wire from a dynamo to the headlight and taillight. Whatever bolt was used to hold the light onto the frame would also pass current to and from the light. Electricity would travel through the steel frame and pass though the headset allowing the fork to be part of the circuit. But most modern headsets are not electrically conductive. So these days all headlights and taillights are designed to use two wires to connect to the dynamo.
All Son hubs except those with "SL" in the name do not conduct electricity through their axles. However, Shimano and Panasonic hubs do conduct through their axles. A few headlights and taillights still conduct via their mounting bolts. If you are using any component that is conductive through its connection to the bicycle, it's easy to create a short circuit when wiring the bike for lights. A short won't damage anything, but the lights just won't come on. So if any two of the components can ground to the frame and your lights don't work after you've wired everything up, just start swapping the connectors to find the short circuit. Once you eliminate the short, the lights will work perfectly.
There are custom frame builders specializing in bikes that resemble older designs from the 1950s and 1960s. These builders often use metal fenders to get electricity to a taillight or even a headlight. Some builders understand that the threaded eyelets they use to attach fenders will become oxidized after a few years use out in normal weather, so they will use stainless steel for those eyelets. But some haven't thought this through, and think that because the lights work when the new bike is being assembled in the shop that they should still work five years later. So if you own one of these bikes and your taillight stops working after a few years, that may well be the reason. Oxidized steel is an insulator, not a conductor.
Since it's no more work to run a two conductor wire between components, I recommend you dispense with using the frame as part of the circuit. Just remember that some components may still ground to the frame and if you connect power to ground with one of these components you'll get a short.
A short circuit won't damage anything. So, if you wire up the system and find it doesn't work due to a short, just correct the wiring and all will be well, no harm done.
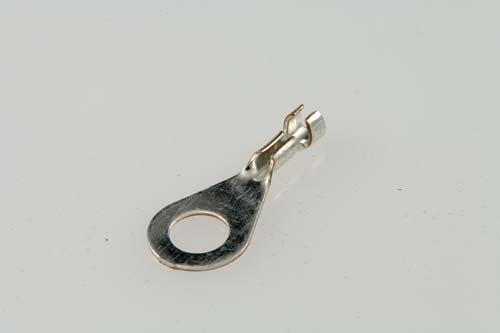
This is the ground connector (to the taillight) for the Schmidt E6 and Edelux headlights. The flat part with the hole in it is placed against the aluminum base of the E6 or Edelux headlight and the bolt that holds the headlight onto whatever mount you use will also hold the ground connector. By having the connector pressed against the base the connector gets the ground current from the base.
As with most of our lighting products, we offer this to bike shops at wholesale pricing.
Schmidt Ring Terminal 6mm Ground Connector, Our part # SCHGC, Retail price: $
0.46
Schmidt Ring Terminal 5mm Ground Connector, Our part # SCH72251, Retail price: $
0.50
Schmidt Ring Terminal 3mm Ground Connector, Our part # SCH72235, Retail price: $
0.50
We can supply taillight wiring with this connector already attached.

Here's a green Edelux headlight. The wire extending down and to the left is for connecting to the dynamo hub. The wire in the upper left is a taillight wire. It's made with the same Co-Axial wire as the input wire from the hub. It has connectors at one end for the headlight.
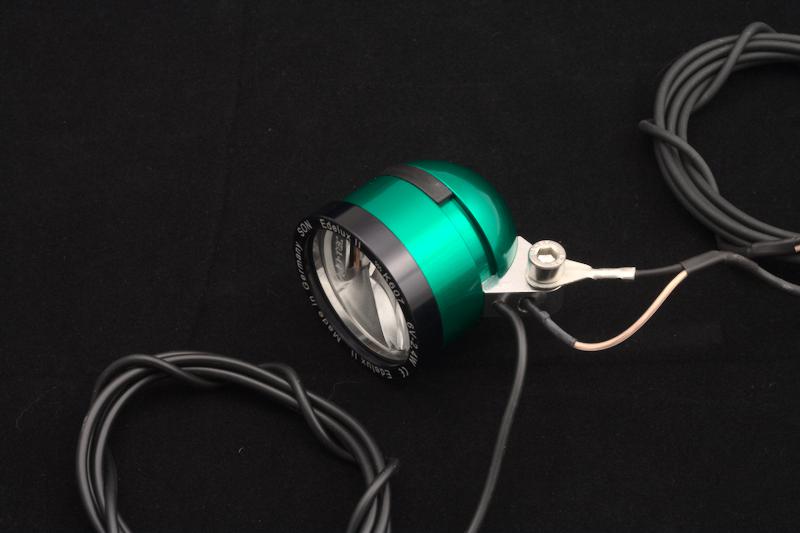
Here the taillight wire has been connected to the headlight. The flat connector has a 6mm hole in it, the same size as the hole in the base of the headlight for attaching it to the mount. I'm not showing the mount in this photo to keep it less cluttered and easier to understand. The other connector is plugged into the socket on the underside of the headlight base. There's a male 2.8mm connector embedded in the headlight base. Make sure you plug it all the way in. I didn't do that for the photo. When you have the 2.8mm female connector in as far as you see it in the photo, it's not all the way in. It needs to go a few mm further.
Many older dynamo taillights ship with a single strand wire. That's because traditionally the commuter bikes in Germany have been made with steel frames and with headsets that conduct electricity. So the ground connection used to be made from the fork where the headlight is normally mounted, through the headset and into the frame. Then it is passed through to the fender or rear rack to whichever is holding the taillight.
But many frames no longer conduct electricity through the fork and frame. Some headsets like the Shimano Ultegra sealed versions don't conduct electricity. And many applications require a nylon mount. This means you'll need a second wire for making the ground connection. And as I write this in 2021, most dynamo light systems require two conductor wire throughout the bike.
Busch & Müller Wiring

Double strand wire, 210cm, female connectors on one end, Part # B&M424DKS4/210, Price: $ 4.50
Double strand wire, 185cm, female connectors at both ends, Part # B&M424/DKS/KS4/185B, Price: $ 5.00
The image above shows a single strand version which we no longer sell.
Schmidt Coaxial Wiring
It's more expensive, but Wilfried Schmidt has made up some taillight wiring sets that are more durable than these double strand wires. They use the same heavy coaxial wire as used for their E6 and Edelux headlights, and have a proper ground and power connector for the headlight end, and either 2.8mm female spade connectors or bare ends for the taillight end.
Finished with the 2.8mm taillight connectors, the price is $ 19.00 , with bare ends and loose connectors, the price is $ 19.00 . At the headlight end, you can get these two ways. One way works with any headlight that can ground through it's base, such as the older halogen Lumotecs, Schmidt E6, Edelux or Edelux II. One connector is placed at the base and attaches with the same bolt used to mount the light. See the "ground connector" pictured above. The other connector is the 2.8mm connector for power. But the newer Lumotec IQ Fly, CYO, Eyc, Luxos and Avy headlights don't ground through the base, and use two 2.8mm connectors, one for ground and one for power. So we also have wires made up with two 2.8mm connectors at the headlight end, and either two more connectors for the taillight already attached, or supplied loose for you to cut and fit yourself.
If you need to watch your pennies, by all means use the double strand wire above. But for the most durable connection, and even a better looking job, use the Schmidt Coaxial taillight wires.
I also stock Schmidt's coaxial wire by the foot. $ 1.00 per foot. All connectors are available individually.
For Busch & Müller's newest headlights, the Lumotec LYT, Avy and Luxos models, the wiring that connects to the hub dynamo plugs into 2.8mm connectors on the headlight. This means that if you would like a heavier duty wire, you can have it. We make up 55cm wires using the same co-axial wire that Schmidt uses. We attach the 2.8mm connectors at one end, and the 4.8mm connectors at the other end to attach to the SON hub's axle connectors.
Schmidt Luxos-LYT-SON wire, 55cm, Part # SCH55CM48-3: $ 15.50
If you're using a Sanyo or Shimano dynamo hub, we have these with bare ends at the hub.
Schmidt Luxos-LYT-bare wire, 55cm, Part # SCH55CMB-3: $ 15.50
Our Busch & Müller taillights have connectors which are clearly marked for power and ground. Attach the power connector on the taillight to the power connector on the headlight, and do the same with the ground connections if needed.
Shimano dynohubs are different from Schmidt in that they do make a ground connection to the frame. That doesn't mean that the connection will make it past the headset to your taillight, though in most cases it will. If it does you will only need a single wire runing to the taillight if the headlight is also grounded to the frame. But you must be careful not to create a short. Many of the taillights that attach to a rear rack will ground to the rack via their mounting bolts. Though not all models do this. The Toplight Flat Plus does not, for example. If by accident you attach a power lead from the headlight to the ground connector on the rack and if the headlight, taillight or Shimano hub is grounded to the frame, you'll create a short. The power leads must only be connected to other power leads whether at the Shimano hub or the headlight or the taillight.
What NOT To Do!
Some folks think it would be great to run wires from the hub to the headlight, and another set of wires from the hub to the taillight. But if you run the lights this way with a hub dynamo, and if you then switch the headlight off, all of the hub's power is available to the taillight, which is not designed to handle it. So, your lovely little taillight will go up in smoke.
It's true that with a tire driven dynamo, such as the Dymotec 6, you can run wires however you like. You can run from the dynamo to the taillight to the headlight, the dynamo to the headlight to the taillight, or the headlight to dynamo to taillight. This will work because the dynamo itself is its own switch. But a hub dynamo is always "on" so to speak, so the taillight is only protected from overvoltage by wiring it directly to the headlight.
To see how to mount headlights and taillights, go to the mounting lights page.
Back to Schmidt hub page
Back to Lighting Systems page
Back to: Peter White Cycles LLC home page
Penny is the Lord High Executioner of Email. So please send your email to Penny.
Mail to:
The email link above uses some fancy javascript voodoo to hide the actual address from spambots. Your browser needs to be set to run javascript in order for you to use any of the email links on my website. If you can't see the links, you can call us. You can also type the address into your email software. First, type the alias, "penny". Then type the "@" sign. It's above the number 2 on your keyboard. Then type the domain, "peterwhitecycles.com". Don't put in the quotes! That should do it.
You can also call us at 603 478 0900
It's best to call before 4PM Eastern time since after that we're either running around like headless chickens or at home ready to jump into the pot.
Please don't place an order without first reading this.
This page updated: Wednesday, October 31, 2018
Peter White Cycles LLC
24 Hall Rd.
Hillsborough, NH 03244
USA
603 478 0900 Phone