| Schmidt SON Headlights for Dynamos | |
|


| Edelux II Co-Axial 6" From Hub | ||||||||||||||
|
|
||||||||||||||
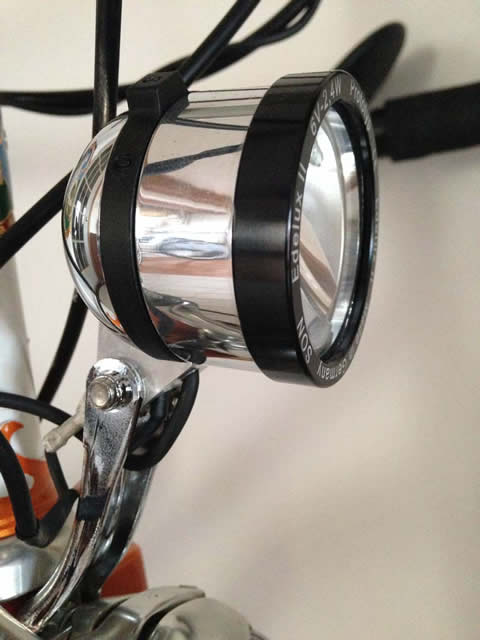
The SON Edelux II can also come fitted with Co-Axial Connectors about six inches from the hub. The short wire stays attached to the SON hub, so you only connect and disconnect at the co-axial connection, which is easier on your fingers than using the direct spade connection at the hub axle. This is ideal when you have front panniers on a "low rider" style rack, because you're less likely to have lots of "stuff" in the way when connecting or disconnecting the wire several inches away from the dropouts than right at the hub axle.
|
||||||||||||||

| Edelux II Co-Axial with Co-Axial Adapter | |||||||||||||||||||||||||||||
|
|
|||||||||||||||||||||||||||||
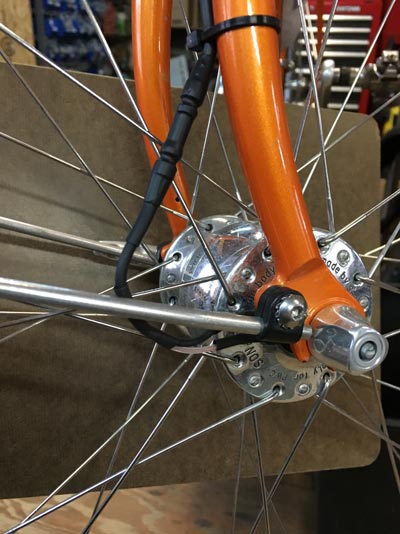
For 2018, Schmidt is offering a new way to connect your headlight to the SON hub. Instead of two 4.8mm female spade connectors at the hub end of the wire, it has a male Co-Axial connector. And then an adapter, the "Co-Axial Adapter" is placed onto the female 4.8mm connectors embedded in the hub axle. That Co-Axial Adapter is left on the hub axle; it's a fairly tight fit and won't fall off. Now, when you take the wheel on or off your bike, you connect or disconnect the male Co-Axial connector on the end of the headlight wire to the female Co-Axial connector that is embedded in the Co-Axial Adapter. 60cm cable is for mounting headlight at fork crown on most bicycles. 100cm cable is for mounting headlight at the handlebar on most bicycles. Other lengths can be made by special order for a small upcharge. We can also provide the Edelux II in red, blue, light green, dark green, gold, orange and pink with Co-Axial Adapter by special order. That can take an extra day or two.
| |||||||||||||||||||||||||||||

| SON Y Junction | |||||||||||||||||||||||||||||||||||
Want to have a charger wired to your SON hub along with your Edelux II headlight and use the Co-Axial Connectors and Co-Axial Adapter? We thought you might. |
|||||||||||||||||||||||||||||||||||
|
|
|||||||||||||||||||||||||||||||||||
The Y Junction has an 80 cm long wire to reach the hub dynamo with the Y Junction positioned somewhere between the headlight and the hub. You put a Co-Axial Adapter on your hub. The Y Junction is positioned along the wire between the SON hub and the headlight. The Y Junction provides a female Co-Axial Connector at its lower end. You take the wire running to your charger and install a male Co-Axial Connector to its end and plug it into the Y Junction. Download a PDF showing how the Co-Axial wire from the headlight is soldered to the Y Junction. Now, you have just a single wire running down your fork to the hub, and if you use the USB-WERK or E WERK from Busch & Müller, or the Appcon 3000, you can easily remove its wiring from the bike, without messing with the headlight wire. Both Busch & Müller chargers have co-axial wire for their input, so the Schmidt Co-Axial Connector can be soldered directly to that input wire. We can do that here for you. Some chargers, like The Plug 5 Pure from Tout Terrain come with a dual strand wire rather than Schmidt's Co-Axial wire, so the Co-Axial wire will first have to be spliced into the dual strand wire. It's not hard to do for anyone with experience doing electrical soldering. And of course we can it for you here. If you bought your charger elsewhere you can send it to us. Placing the Y Junction 80cm from the hub is long enough for most installations with the headlight mounted at the handlebar. Order part number SCH72635 for the 80cm wire with Co-Axial Connector already attached. See below to the next heading for our assortment of Edelux II headlights with the Y Junction already installed.
| |||||||||||||||||||||||||||||||||||

| SON Edelux II with Y Junction Installed | |||||||||||
We have Schmidt make the Black Edelux II in batches with the Y Junction already installed. The total wire length is 60cm from headlight to hub, and the Y Junction is positioned right below the headlight. This is perfect for most installations where the headlight is mounted at the fork crown. And since they make bunches and bunches (please excuse the technical terminology) this way, they cost a bit less than if we make them up here. |
|||||||||||
|
|
|||||||||||
We now stock the Edelux II in Black with the Y Junction installed 6cm from the base of the headlight, and with 51cm of wire between the Y Junction and the hub. That gives you a 60cm length of wire from the headlight to the hub; perfect for when the headlight is mounted at the fork crown on most bicycles. It positions the Y Junction just behind the headlight in a vertical orientation. That's important if you ride in rain without the charger plugged into the Y Junction as water could cause a short circuit, and your light would stop working, though nothing would be damaged unless, of course, you crashed.
| |||||||||||

| SON Edelux II headlight with Y Junction, custom wire lengths, no Co-Axial adapter included | |||||||||||||||||||||||||||||||||||||||||||||||||||||||||||||||||||||||||||||
We stock the Edelux II headlights in all of the anodized colors that Schmidt makes. Even Orange. Aaargh! That means we can make up a headlight, with a Y Junction, and Co-Axial connection at the hub, with whatever wire length you need for your bike, and the Y Junction can be positioned anywhere along the wire that works for you. |
|||||||||||||||||||||||||||||||||||||||||||||||||||||||||||||||||||||||||||||
| |||||||||||||||||||||||||||||||||||||||||||||||||||||||||||||||||||||||||||||
| SON Edelux II upside down | ||||||||||||||||||||||||||
There are three upside down versions! All versions make the electrical connection to Ground via the mount. Two versions with switch are available, polished finish and black anodized. These are the most popular versions and have an On/Off switch, 140cm wire to the hub, and taillight connections. A third version has no switch or taillight connections. It's intended for custom bikes with a switch provided by the frame builder. Unlike the regular Edelux II headlights, there is no Senso function on any upside down version. See the pretty pictures! |
||||||||||||||||||||||||||
|
|
||||||||||||||||||||||||||
The photo above left shows the Edelux II Upside-Down as it ships. Don't use it this way! Above right shows it how it is intended to be used. There's a crimping connector screwed onto the positive taillight connection. But here I just haven't crimped a wire onto the connector. The loop of wire in the background is for connecting to the hub dynamo. Now look at the two photos below. |
||||||||||||||||||||||||||
|
|
||||||||||||||||||||||||||
The photo on the left is how this light should be used if you do not have a taillight connected to the headlight. If you don't like the look of the taillight wire connector, just put a small washer under the screw head and tighten down the screw. Under no circumstances should you use the light as shown in the right photo. Without a screw in the threaded hole, water can easily get in when it rains and the water will cause a short circuit, and your headlight won't work! |
||||||||||||||||||||||||||
| ||||||||||||||||||||||||||


| Don't these dynamo lights Blow Up? | ||
If you do a search on the internet for bicycle dynamo lighting systems, you will undoubtedly come across warnings about bulbs burning out if you ride your bike too fast. This is true of systems designed back in the 1920s, and used on bikes such as Raleigh three speeds up through the early 1980s. These were very crude systems by today's standards, with no voltage limiting. While you can still buy cheaply made dynamo lights that will blow bulbs on a downhill run, none of the systems I sell are so poorly made that you have to concern yourself with this, if used with a proper 6 volt, 3 watt dynamo. Without exception, every headlight I sell for use with either a hub dynamo or sidewall dynamo incorporates circuitry to prevent the overvoltage of the bulb. You have absolutely nothing to worry about. |
||
| One Caveat! | ||
Schmidt Edelux and Edelux II headlights are made to be powered by a 6 volt, 3 watt hub dynamo. The use of Edelux or Edelux II powered by Velogical dynamos or other experimental generators risks damage to the headlight's electronics. Damage caused by overload through such generators is not covered by the 5 year Schmidt guarantee! But more importantly, damage is most likely to occur while riding fast, descending a hill. That can cause your headlight to fail, potentially leading to a crash and injury to the rider. With a proper dynamo hub, such a failure is virtually impossible. For your own safety, please do not use any lights made by Schmidt with a Velogical dynamo. |
||
| Taillights | ||
We have quite a few taillights that can be attached to the headlight. If you use a taillight with a halogen headlight, you should use a different bulb than if you use the headlight alone. With an LED headlight, there's nothing to change in the headlight regardless of whether a taillight is used. Schmidt makes taillights for use with Schmidt headlights. These are also compatible with most Busch & Müller headlights. And all Busch & Müller taillights work with Schmidt headlights. |
||
| The Great Taillight Controversy | ||
Some people worry that if they have a taillight wired to the system, the wire might be damaged somehow, causing the taillight to fail. Others take their bikes on trips via airplane, and need to remove rear racks and fenders to pack the bike, and the dynamo powered taillights need to mount on either a rack or a fender, raising the issue of having to disconnect a wire along with the rack or fender. But these issues need not be a problem. I have plenty of wire connectors here that can be used in-line, so that when you remove your rack, you quickly disconnect the wire right along with it. Unbolting a rack is a lot more work than disconnecting an electrical connector that's designed for that purpose. And by using dynamo powered taillights, you reduce the need for batteries, the expense of buying new ones, and the hassle of being sure rechargeable batteries are properly charged. Battery taillights are great for backing up dynamo taillights, in the rare case of a wire failure or circuit failure inside the light itself. As of March 2007 I also have heavy duty coaxial wire available which should make people less concerned about wire failures. In practice, wire failures are extremely rare, even with the light weight wire from Busch & Müller. I know this because I have quite a few customers for whom I have installed their taillights myself, and who ride many thousands of miles a year, and are here with their bike quite frequently. It just isn't a problem, in practice. I sell several hundred wired taillights a year, and it's rare to have a customer call to complain about his wire failing. Almost all calls come while the customer is installing the system for the first time. I still recommend a second battery powered taillight, either for the added light, but mostly as a backup in the rare event a wire does fail. However, it's generally best to leave them switched off, and save the battery for when it's really needed on a rainy night. When you consider all of the pros and cons, if you could only have one taillight, if at all possible it should be wired and powered by the dynamo. |
||
|
Back to: Peter White Cycles LLC home page Penny is the Lord High Executioner of Email. So please send your email to Penny. Mail to: The email link above uses some fancy javascript voodoo to hide the actual address from spambots. Your browser needs to be set to run javascript in order for you to use any of the email links on my website. If you can't see the links, you can call us. You can also type the address into your email software. First, type the alias, "penny". Then type the "@" sign. It's above the number 2 on your keyboard. Then type the domain, "peterwhitecycles.com". Don't put in the quotes! That should do it. You can also call us at 603 478 0900 It's best to call before 4PM Eastern time since after that we're either running around like headless chickens or at home ready to jump into the pot. Please don't place an order without first reading this. This page updated: Monday, May 20, 2019 Peter White Cycles LLC |